Pages

9.26.2014

Tell All Thursday: The Skies The Limit

Our hallway transformation:


So here's our hallway on moving day- July 2013


Here is our hallway almost 1 year later- April 2014

We added baseboards, added trim around the door frames, and added wainscoting. We changed out the light fixture and painted away the red walls. We also created a frame wall.


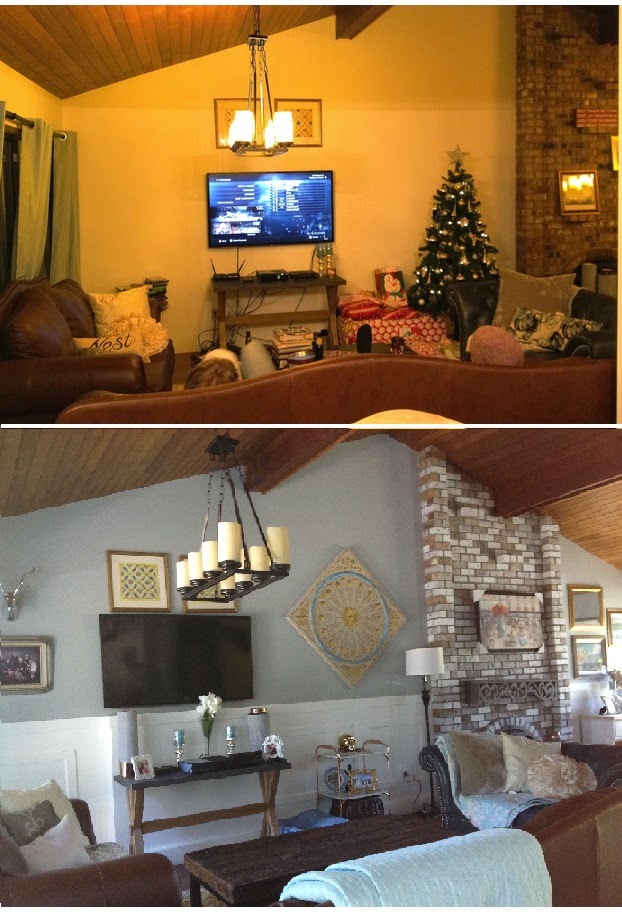
Here is our hallway today- September 2014

Spy the differences? We painted our walls- Derek's decision. Some times he has good ideas =P This was one of them.

An even better idea was MINE =) I got the crazy idea to cover up the popcorn ceiling. Seems easier to just cover it up instead of scrapping it off right? hmmm somehow I convinced Derek that this would be easier and totally worth the entire day of our manual labor.


Please note that there are still a couple frames still missing from the frame wall =P Clearly I get side tracked easily..
However..how right was I? Best idea ever! Look at that ceiling!


All you need are:
-nail gun (and a very long extension cord)
-jigsaw
-table saw (maybeee)
-stud finder
-2 ladders
-sheets of bead board
-the same trim we used for the top of the wainscoting
-paint, paint brushes, rollers
-caulking
-a helper that has very strong arms

The steps are:
1) Decide which way you want the lines going on the ceiling.
 
2) Pre-measure your ceiling before going to the hardware store because bead board often comes in large sheets. You'll want to ask the friendly gentlemen at your local hardware store to pretty please with a cherry on top cut them to size for you. 

3) If you don't ask nicely enough they may just cut them to fit in your car and you will then need your table saw to cut the bead board to size yourself. 

4) We have a light fixture and smoke detector that we had to take into account; so we had to make sure the light and smoke detector would not intersect with the trim. We removed the ceiling fixtures and used our jigsaw to cut a hole where we could thread their wiring through.

5) Then we used the stud finder to mark (you may just mentally mark this) where we could secure the bead board to the ceiling without it crashing down on us. Keep your stud finder handy even after marking the ceiling. Try to remember their general vicinity.

6) Then came the hard part- one of us would hold the bead board to the ceiling. This would cover up the markings we made to show us where the studs were. Run the stud finder along the bead board where you remember making the markings on the ceiling. Then finding the stud, use your nail gun to secure the bead board to the ceiling. (**Note to the partner with the nail gun- remember that your helper is standing on a ladder holding the heavy bead board in place while you search for the studs so please hurry and offer many words of encouragement =P **)

7) After the first bead board sheet is secure, repeat the same steps for the rest of the sheets. Do not worry about matching all the seams.

8) After all the bead board is secured to the ceiling, cut your trim to size. Then simply nail them to your ceiling over top of the bead board sheets. We decided to just install them where the seams of each sheet met. However, you can really create any pattern you like with the trim.

9) Then to hide all the imperfections, use your caulking to close up all the seams.

10) Lastly, after all of the caulking is dry. Lay on a coat of fresh paint.


AND AFTER JUST 10 EASY (okay maybe easier read than done) STEPS- you will have replaced your popcorn ceiling with this beauty! TADAAA!!


9.13.2014

Junk-Me-Not: Bar Cart and Side Table

Refurbished Bar Cart:


And because today is a waiting around for my flight to Turks and Caicos kind of day... here is blog # 2 for the day!

So as promised, here is a post of our re-purposed bar cart and side table.

I actually found these on the side of the road as I was driving to work one day.
Someone had thrown them out on the sidewalk... why? Maybe because they were old, ugly, and outdated... just maybe.


I'm not sure what it was about these 2 pieces of junk that made me stop but I did. I peered at them from the comfort of the inside of my warm suv. Then in a moment of insanity, I braved the frosty winter air and threw them into the back of my suv. Then I drove to work.

At the end of the work day, on the drive home, I remember plotting how I was going to phrase "Hey babe! I found these pieces of junk that someone threw out and I love them!" in a way that Derek would allow me to keep them.

In the end, we made a deal that I would do all the work myself to refurbish them and if they did not pass his seal of approval, I would drive them to a dump site that very day.


Step 1: I spray painted the already gold legs with a fresh coat of gold paint. I LOVE gold! I have always loved it and you know what they say- why fix it if it aint broke? And gold aint broke so gold it stayed.


Step 2: The fruit had to go! Nothing against fruit art... they just didn't work with my vision. To be honest, I had no vision at this time... I just need a clean slate- so I painted the tray white.


Step 3: I didn't want to put a plain white tray against white wainscoting so I needed to add some color.


Final Product!

I love love love the way this turned out! I left the wheels transparent but spray painted the handles gold. And what is a piece of furniture without it's accessories?


Who doesn't love a gold skull?


Gold Skull: Z Gallerie (Scottsdale Arizona location)
Photo frame, photo albums, and vase: Homesense
Wicker Basket: Superstore
Bar Cart: Neighbor's Garbage ;)


After getting the seal of approval for the bar cart from Derek, I moved onto the side table.

Step 1: I sprayed the legs gold as well.
Step 2: I sanded the thick coat of laquer off the wood frame.
Step 3: I white washed the wood frame.
Step 4: We had an old black lamp so I painted the base of  it to match the bar cart trays.


And now they fit so perfectly into our space you would never know they were once another man's trash ;)


Transformation (sa-)Tuesday: Living/Family Room

Our Living Room Transformation:


It's Satuesday today which means it's actually Saturday but I'm posting a transformation post so it's really our Transformation Tuesday on a Saturday= Sa-Tuesday.

We actually tackled this room several months ago but never found the time to blog about it. It was when I was having my morning coffee in my freshly cleaned kitchen, with the sliding doors to our back deck open for Baloo to growl at the twin malteses in the neighboring yard, that I caught myself admiring how well our living/family room has come together in the last year that we've lived here. So after that extremely run on sentence of a thought, I decided it was high time to share it with the world. 

You may remember our post in March about our kitchen transformation (if not- check it out!) where we had posted this photo of our new- de-walled view to the living room:


Look past my beautiful friends, and note our TV stand in the background. 
I had bought an occasional table that was on sale for only $100 from Urban Barn. It had criss-crossed light wooden legs and a mat grey concrete top. It didn't match anything in our house. It didn't have any shelves to store any dvds just the one top for electronics. It didn't even  have a back to hide wires. 

Butttt...I bought it...yeah I did.. Hey! It was on sale-- It was on sale at Urban Barn! 
One does not pass up anything at Urban Barn that is on sale for $100! That's like the price of 2 regular priced throw pillows okay?!?!

So without consulting Derek, I paid- agreeing to the fully non refundable cancellation policy, threw it into the back of my suv, dragged it up the stairs of our home, and breathed a sigh of relief as it jussttt fit under the TV. *** Note to all TV console buyers- measure your TV before buying the table ;) ***


And here is a picture of Derek and Carsen playing video games. I thought it was a cute bromance moment, wanted to capture it on my camera, and then when I uploaded all my pictures, I was horrified at the state of my living room! Is that seriously MY living room?! HELLOO buyers remorse!

Wires galore and a side table stacked with dvds and video games! =(

So how do you hide wires behind a console table without a back?
1) do not buy a console table that does not work for your space at all just because it is on sale
2) punch a hole in the wall and run the wires down behind the tv
3) get creative! save your table and save your wall!


Watching trashy TV shows is classy when you have a pretty TV set up right?

Where did the wires go??? We boxed them in! We built a box around the wires with easy access by simply unscrewing a side panel. TADA!!!

Since then, we have also added wainscoting to either side and painted our walls grey. The grey paint was Derek's idea and though I was not 100% sold, I went with it. After all, he wasn't 100% that the wainscoting and 2x6 baseboards were going to turn out as I had planned but helped me turn my dream to reality anyway (thanks hubs). Here is how it all turned out!


And 1 year later...it finally feels like home sweet home; it finally feels like OUR home. 

Baloo's favorite spot is right beside a wicker basket we bought to conveniently tuck away dvds and video games. (Bar cart- turned display shelf will soon be on the blog)

What we love most about this space is how all the different colors and textures really came together and complimente one another- which is something a compulsive clearance buyer like me is very proud of!


So even though it took 1 year to get here. It was totally worth all the time and effort it took. A big thank you to Christina, my amazing friend, and my superwoman mother in law for coming over to help us paint! 

There's still so much to do, like actually hanging that painting and mantel above the fireplace, but today, I am happy with how far we have come. I'm thankful for our home sweet honey do list of a home.