Pages

9.26.2014

Tell All Thursday: The Skies The Limit

Our hallway transformation:


So here's our hallway on moving day- July 2013


Here is our hallway almost 1 year later- April 2014

We added baseboards, added trim around the door frames, and added wainscoting. We changed out the light fixture and painted away the red walls. We also created a frame wall.


Here is our hallway today- September 2014

Spy the differences? We painted our walls- Derek's decision. Some times he has good ideas =P This was one of them.

An even better idea was MINE =) I got the crazy idea to cover up the popcorn ceiling. Seems easier to just cover it up instead of scrapping it off right? hmmm somehow I convinced Derek that this would be easier and totally worth the entire day of our manual labor.


Please note that there are still a couple frames still missing from the frame wall =P Clearly I get side tracked easily..
However..how right was I? Best idea ever! Look at that ceiling!


All you need are:
-nail gun (and a very long extension cord)
-jigsaw
-table saw (maybeee)
-stud finder
-2 ladders
-sheets of bead board
-the same trim we used for the top of the wainscoting
-paint, paint brushes, rollers
-caulking
-a helper that has very strong arms

The steps are:
1) Decide which way you want the lines going on the ceiling.
 
2) Pre-measure your ceiling before going to the hardware store because bead board often comes in large sheets. You'll want to ask the friendly gentlemen at your local hardware store to pretty please with a cherry on top cut them to size for you. 

3) If you don't ask nicely enough they may just cut them to fit in your car and you will then need your table saw to cut the bead board to size yourself. 

4) We have a light fixture and smoke detector that we had to take into account; so we had to make sure the light and smoke detector would not intersect with the trim. We removed the ceiling fixtures and used our jigsaw to cut a hole where we could thread their wiring through.

5) Then we used the stud finder to mark (you may just mentally mark this) where we could secure the bead board to the ceiling without it crashing down on us. Keep your stud finder handy even after marking the ceiling. Try to remember their general vicinity.

6) Then came the hard part- one of us would hold the bead board to the ceiling. This would cover up the markings we made to show us where the studs were. Run the stud finder along the bead board where you remember making the markings on the ceiling. Then finding the stud, use your nail gun to secure the bead board to the ceiling. (**Note to the partner with the nail gun- remember that your helper is standing on a ladder holding the heavy bead board in place while you search for the studs so please hurry and offer many words of encouragement =P **)

7) After the first bead board sheet is secure, repeat the same steps for the rest of the sheets. Do not worry about matching all the seams.

8) After all the bead board is secured to the ceiling, cut your trim to size. Then simply nail them to your ceiling over top of the bead board sheets. We decided to just install them where the seams of each sheet met. However, you can really create any pattern you like with the trim.

9) Then to hide all the imperfections, use your caulking to close up all the seams.

10) Lastly, after all of the caulking is dry. Lay on a coat of fresh paint.


AND AFTER JUST 10 EASY (okay maybe easier read than done) STEPS- you will have replaced your popcorn ceiling with this beauty! TADAAA!!


9.13.2014

Junk-Me-Not: Bar Cart and Side Table

Refurbished Bar Cart:


And because today is a waiting around for my flight to Turks and Caicos kind of day... here is blog # 2 for the day!

So as promised, here is a post of our re-purposed bar cart and side table.

I actually found these on the side of the road as I was driving to work one day.
Someone had thrown them out on the sidewalk... why? Maybe because they were old, ugly, and outdated... just maybe.


I'm not sure what it was about these 2 pieces of junk that made me stop but I did. I peered at them from the comfort of the inside of my warm suv. Then in a moment of insanity, I braved the frosty winter air and threw them into the back of my suv. Then I drove to work.

At the end of the work day, on the drive home, I remember plotting how I was going to phrase "Hey babe! I found these pieces of junk that someone threw out and I love them!" in a way that Derek would allow me to keep them.

In the end, we made a deal that I would do all the work myself to refurbish them and if they did not pass his seal of approval, I would drive them to a dump site that very day.


Step 1: I spray painted the already gold legs with a fresh coat of gold paint. I LOVE gold! I have always loved it and you know what they say- why fix it if it aint broke? And gold aint broke so gold it stayed.


Step 2: The fruit had to go! Nothing against fruit art... they just didn't work with my vision. To be honest, I had no vision at this time... I just need a clean slate- so I painted the tray white.


Step 3: I didn't want to put a plain white tray against white wainscoting so I needed to add some color.


Final Product!

I love love love the way this turned out! I left the wheels transparent but spray painted the handles gold. And what is a piece of furniture without it's accessories?


Who doesn't love a gold skull?


Gold Skull: Z Gallerie (Scottsdale Arizona location)
Photo frame, photo albums, and vase: Homesense
Wicker Basket: Superstore
Bar Cart: Neighbor's Garbage ;)


After getting the seal of approval for the bar cart from Derek, I moved onto the side table.

Step 1: I sprayed the legs gold as well.
Step 2: I sanded the thick coat of laquer off the wood frame.
Step 3: I white washed the wood frame.
Step 4: We had an old black lamp so I painted the base of  it to match the bar cart trays.


And now they fit so perfectly into our space you would never know they were once another man's trash ;)


Transformation (sa-)Tuesday: Living/Family Room

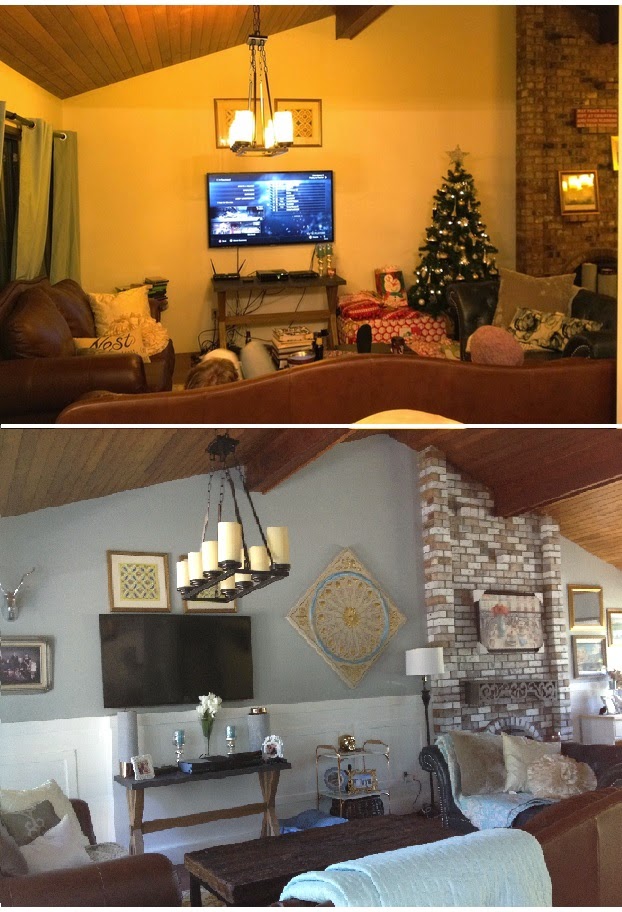
Our Living Room Transformation:


It's Satuesday today which means it's actually Saturday but I'm posting a transformation post so it's really our Transformation Tuesday on a Saturday= Sa-Tuesday.

We actually tackled this room several months ago but never found the time to blog about it. It was when I was having my morning coffee in my freshly cleaned kitchen, with the sliding doors to our back deck open for Baloo to growl at the twin malteses in the neighboring yard, that I caught myself admiring how well our living/family room has come together in the last year that we've lived here. So after that extremely run on sentence of a thought, I decided it was high time to share it with the world. 

You may remember our post in March about our kitchen transformation (if not- check it out!) where we had posted this photo of our new- de-walled view to the living room:


Look past my beautiful friends, and note our TV stand in the background. 
I had bought an occasional table that was on sale for only $100 from Urban Barn. It had criss-crossed light wooden legs and a mat grey concrete top. It didn't match anything in our house. It didn't have any shelves to store any dvds just the one top for electronics. It didn't even  have a back to hide wires. 

Butttt...I bought it...yeah I did.. Hey! It was on sale-- It was on sale at Urban Barn! 
One does not pass up anything at Urban Barn that is on sale for $100! That's like the price of 2 regular priced throw pillows okay?!?!

So without consulting Derek, I paid- agreeing to the fully non refundable cancellation policy, threw it into the back of my suv, dragged it up the stairs of our home, and breathed a sigh of relief as it jussttt fit under the TV. *** Note to all TV console buyers- measure your TV before buying the table ;) ***


And here is a picture of Derek and Carsen playing video games. I thought it was a cute bromance moment, wanted to capture it on my camera, and then when I uploaded all my pictures, I was horrified at the state of my living room! Is that seriously MY living room?! HELLOO buyers remorse!

Wires galore and a side table stacked with dvds and video games! =(

So how do you hide wires behind a console table without a back?
1) do not buy a console table that does not work for your space at all just because it is on sale
2) punch a hole in the wall and run the wires down behind the tv
3) get creative! save your table and save your wall!


Watching trashy TV shows is classy when you have a pretty TV set up right?

Where did the wires go??? We boxed them in! We built a box around the wires with easy access by simply unscrewing a side panel. TADA!!!

Since then, we have also added wainscoting to either side and painted our walls grey. The grey paint was Derek's idea and though I was not 100% sold, I went with it. After all, he wasn't 100% that the wainscoting and 2x6 baseboards were going to turn out as I had planned but helped me turn my dream to reality anyway (thanks hubs). Here is how it all turned out!


And 1 year later...it finally feels like home sweet home; it finally feels like OUR home. 

Baloo's favorite spot is right beside a wicker basket we bought to conveniently tuck away dvds and video games. (Bar cart- turned display shelf will soon be on the blog)

What we love most about this space is how all the different colors and textures really came together and complimente one another- which is something a compulsive clearance buyer like me is very proud of!


So even though it took 1 year to get here. It was totally worth all the time and effort it took. A big thank you to Christina, my amazing friend, and my superwoman mother in law for coming over to help us paint! 

There's still so much to do, like actually hanging that painting and mantel above the fireplace, but today, I am happy with how far we have come. I'm thankful for our home sweet honey do list of a home.


6.22.2014

Transformation Tuesday: Master Bathroom

Our master bathroom transformation:


Our old-new-townhouse had a lot of things that we did not like but our master en-suite was not one of them.


It was big and bright with tons of counter space and a huge shower. There was no mold, no mildew, no cracked or missing tiles, there was an extractor fan, and the sink drained every time.

When we bought our new-old-house, it also had a master en-suite....


The shower is 3 feet by 3 feet. The tiles moved when we pushed on them. We had to shower with the window open because there was no extractor fan.

First, we ripped out the old, tile shower and installed a new, plastic, shower insert. Since it was summer, it was alright but seeing as how winter was a couple months away, we knew we had to install an exhaust fan so we could shower with the window shut.

The old shelves were slanted, so after our hairspray fell into the toilet for the 3rd time, we decided to replace them with a shelf we found at Homesense and 2 hanging baskets.


We also replaced the old mirror and added some final finishing touches. It was finally starting to feel like our home.

Thennn our sink stopped draining....
We had to use a toilet plunger in our sink weekly....
Yes... we disgust ourselves...

So on the list it went, "HONEYYY!"


We looked high and low and each sink we saw was too small. So I did what I do when all else fails- craigslist it! And low and behold- 22" by 16"! Woot Woot!


We went to Ikea and bought a stock countertop and after watching several you tube videos... tada! If you're interested in this project, you will need a table saw to cut the laminate piece to size and a jig saw to cut out the hole for the sink. The sink comes with a template for you to trace a hole onto the countertop. 

Tip: Make sure you cut the counter top with the top facing downward so the cut will be much smoother.


Here is our new bathroom!!! We painted the inside of the shelf white to brighten up the room a bit more, replaced the mirror (yes...again), and bought some baskets to keep extra toiletries under the sink.


Home sweet honey do list- Master Ensuite- Check!


4.02.2014

Transformation Tuesday: Our Creepy, Red Hallway

Our hallway Transformation:


Sorry for the belated Transformation Tuesday post but better late than never! 
The very first walls we ever painted in our new old house were these red hallways. Like why?


You might not be able to see them from the picture above, but there were also these teeny tiny "baseboards" that were installed all over the house. I am not even exaggerating when I say that they were half inch baseboards...in fact, I don't even think they make baseboards that thin so they couldn't have been actual baseboards..

On top of that, I found out that they were just glued to the wall. I discovered this when my swiffer wetjet bumped against the baseboard and an entire strip literally popped off the wall! So then I proceeded to bump each length of baseboard with my swiffer and found that each of them would indeed just pop off the wall with a little nudge. 

Sorry, let me retract that last statement. There were a couple baseboards that would not just pop off the wall. After further investigation, I found that a couple pieces of baseboard were actually screwed, yes screwed...no, not nailed...screwed into the walls- just a few... possibly the ones that were in high traffic areas that would get knocked off occasionally more than the other baseboards? Ever heard of a finishing nail? That would be what normal people would use... *hint *hint.

On top of that, on top of that, the popping baseboards led me to the fireplace where I realized the previous homeowner had installed baseboard around the base of the fireplace... Is it just me or is that weird?


So let me recap, we had teeny tiny half inch "baseboards" that were just glued or severely, overkill-y screwed into the walls, which also wrapped around the fireplace. 

How did we fix this?

Well the gap between the wall and the flooring was pretty wide, so Derek and I knew we had to get a really thick baseboard. The baseboard that the previous homeowner installed turned out to actually be corner trim. He was obviously trying to find a cheap alternative to thick baseboards. This is what it looked like:


We also needed a cheap alternative because any baseboard that would be thick enough to cover the gap started at $4/linear foot. So for one hallway, that would have been over $200, just for the baseboard. However, Derek and I knew we wanted to do some wainscoting in the hallway as well. So we opted for our version of a cheap alternative to thick baseboards. 

Out went the corner trim and in went 2x6's. Derek was a little hesitant at first as he is with all of my crazy penny pinching schemes, but in the end, he saw the light! Oh! Speaking of light, we also changed out the gold light fixture, which made a world of a difference. I'm all for gold but tasteful gold!

Here is a picture of the finished product: 


We still need to do a few more things like adding trim to the end closet and finishing our frame wall but we're so happy with the way everything turned out.
Now when we come home and walk up our front stairs, instead of seeing red, we have a feature wall that makes a statement in a classier way than an explosion of shocking color =) 


Here is what the new view from our front entry looks like:
Baloo says welcome home =)


3.12.2014

Transformation Tuesday: White Washed Fireplace

Oh our big, red, brick fireplace..

Everything in this house, and I mean everything, was red.. Even our fireplace was red brick!
It doesn't look red in the photo below but trust me- it was very red!
This photo was taken during the home inspection. So, I'm very sorry to say that I cannot take credit for the tasteful stuffed animal head decor... yes... stuffed animal heads... why? Why?!


After months of staring at it and hoping one day I would magically fall in love with  the red brick, I finally came to my senses.. the red brick had to go.
So while Derek was at work I took the liberty to mix two different ratios of paint and water, grabbed a ladder, a brush, a rag, and got to work.


And this is the finished product! 

Here's how I achieved this:

1) Make sure you dust or wipe down the brick before you start. If you don't, your brush is going to collect all that nasty stuff and you'll have to wash your brush every twp minutes.

2) I chose to white wash the brick with two different shades of white. I made one white wash mix with half part water and half part paint. For the other white wash mix, I used three quarters water, and one quarter paint.

3) Tip- keep your rag handy as white washing is a messy and drippy craft.

4) Use your imagination to map out which bricks you want to paint with the heavier paint mix and the lighter paint mix.


Next up- how to get rid of the randomly placed, protruding bricks and finding/making a mantel!


3.06.2014

Tell All Thursday: Kitchen Renovation

As promised last Tuesday, here is a post on how we took our extremely outdated and nonfunctional kitchen and made it beautiful and practical for all under $7000!

I have always known that my dream kitchen would be white! Ideally, I would have loved to have the glass cabinet fronts where, in my dreams, I would display my fine bone china collection. This fine bone china collection is in fact, nonexistent =P hey..this is my dream!


When I told Derek that I wanted gold hardware he didn't agree at all but said "we'll cross that bridge when we get there". Keep in mind that this discussion took place in the spring of 2013 when this "ALL GOLD EVERYTHING" fad had not yet taken over the world. Do you know how hard it is to try to find tasteful gold hardware when the last time it was popular was in the 80's?!? Very hard!
In fact, when I tagged along with my dad to Home Depot around this same time, I had asked a sales associate if they have any gold kitchen cabinet hardware? This seemingly sweet old gentleman stepped back and took a look at me and then laughed, "No! We don't have gold knobs! Those are so out of style!" ....... thank you.
On top of it all, my dad decided to band wagon onto this man's point and add, "Yeah, Jermaine. Gold knobs are so out!" ....... thank you- dad!

My response: "Gold is going to make a come back! Mark my words!" Yes, I actually said "Mark my words!"


I finally found my gold hardware in the heavy duty hardware section. It's 2 rows down from the regular kitchen hardware in Home Depot. Although, with the new All Gold Everything trend they may be easier to find now.

In order to save some money, we spent a lot of time bargain hunting. We put together many collages that we re-worked many times over. If certain pieces we would choose for the kitchen would cause us to go over our budget, we would have to find an alternative. If the alternative caused the rest of the elements we had chosen not to match, it was back to the drawing board.

Here is a list of the materials we chose and why we chose to them:


1) The only thing we really kept with this kitchen was it's cabinets. They are solid wood and the price to get custom cabinets made was just ridiculous! So we decided to paint them ourselves.
I had gotten a quote from Home Depot for refinishing our cabinets white. Guess how much? $3000! For paint! How?!?! Why?!?!
I'll tell you how! I'll tell you why! Because painting your cabinets is a b*tch and half! That's how! That's why! I'm not even exaggerating when I say this! After sanding each and every single one of them down and the third coat of paint, we looked at one another and thought... "$3000? That's all?! Peanuts!!" However, after the fifth and final coat of paint, and eight months to forget the pain of it all, I can say it was worth it! We did splurge on expensive kitchen cabinet paint but the total only came to $100!


2) We chose laminate counter tops. Although we initially wanted to go solid surface on all our counter tops and our island, I knew that $7000-$10000 for counter tops was above and beyond what I was willing to pay. We paid a little bit more for a higher quality laminate that had enough texture and shine to resemble the real marble counter top we chose for our island.
Including our initial consult, installation, and materials, the total cost for the laminate counter tops was $800! Not only was it affordable, Mega Countertops (Home Depots supplier and installer) was efficient, accurate, and their quality of work and material was superb!
After the consultation, it took them 2 business days to tell me how much it would cost. The cost was exactly as they said it would be; no surprises! It took them 2 hours to install and best of all...when people come over, we actually have to point out that our counter tops are in fact, not marble, but laminate! That is seriously how good they are! I'm telling you people, laminate counter tops have really come a long way!


This picture is of the Greek Marble (top) and the Faux Marble Laminate (bottom)


3) We chose marble as our solid surface material for our island. This was just based on personal preference. I did a lot of browsing to find exactly what I had in mind. I realized that I NEEDED Italian calcutta gold marble! That did not happen...
We went with our manufacturer to 2 different suppliers and found that the Italian calcutta gold marble would cost us about $6000 for an island top that was 6 ft by 4 ft. And this price was on sale!!!
We were just about to pull the trigger; thinking, "OMG! Italian calcutta gold marble for 50% off!!! When my husband stumbled upon a lone slab of Greek marble.
It was not as pretty. And it had little veins of red running through it. I was about to turn my nose up at this "low quality, unItalian marble" when we found out that the price of this piece of marble for our island, fully installed would be only $2800! SOLD!

In a future post, I will address why we chose to go with the Greek marble instead of springing for the Italian marble. There are so many ways to cut cost when it comes to a kitchen reno that I really should do this in 10 parts! Stay tuned for the Greek VS Italian marble showdown post!


This picture is of the Italian calcutta gold marble


4) We went with Sears Appliances for all our fridge, range/stove, over the range microwave, and dishwasher. Getting all your appliances in one place will get you a better deal as many appliance sales associates work on commission. My husband does not like shopping for appliances precisely because he knows the sales associates work on commission...however, I know this is good because this means you can bargain with them! ;) Also, purchasing all your appliances from one store will cut the cost of delivery as you will only have to pay it once, or in our case, bargain it off the bill! :)

Do your research and do not be afraid to ask if stores will price beat! We went to the Brick, the Bay, Home Depot, and Sears. In the end, Sears could offer us the best prices so we went with them. Our wine fridge, we found on sale at Walmart ;) That one- Sears could not price beat- only $150!
The total price for our fridge, stove, over the range microwave, dishwasher, and wine fridge was $2200!


5) As gross as the tile floor was, I actually contemplated leaving it as is to avoid having to spend more money. One day, during a routine trip to Home Depot we decided to ask a sales associate how much (just roughly) some new, fancy, slate floors would cost. They gave us an approximation, including materials and labour. It was not bad! Only around $3000. So we decided to get a real quote! At this point, we had already told our contractor to rip out the old nasty tile since it was only going to cost us $3000....talk about jumping the gun! The tile installation company, who shall remain nameless, came back with a quote of a whopping $8000! We tried to bring the cost down by looking at cheaper tiles but it was really the sub-floor and labour that was so pricey!

So with a kitchen with no sub floor, we had to make a call... We decided to go with laminate! They say not to do laminate in a kitchen because if there is a spill or flood from an appliance...well, there goes your floors. However, at this point, it was cheaper to replace laminate floors in the event that there was a disaster!
Another reason we were hesitant with the laminate flooring is that the rest of our house had laminate floors that were installed 4 years ago and were now discontinued. How were we going to transition from one kind of laminate into another?!? Our creative solution- a transitional stripe of tile! Sounds crazy I know, but in the end it really turned out well! The best part is- including materials and labour, the total cost came to $1000! We even have a few boxes of left over laminate justttt in case we have  a spill.


6) Oh our beadboard back splash! This project, I will most definitely take all the credit for!
1) Because convincing Derek that this was a good idea was like pulling teeth.
2) Because I blended those seams like a pro! A pro beadboard back splash seam blender!
We initially wanted a tiled back splash and were given a quote of only $500. However, after the installer came to take a proper look, that price went up to almost $900! And since this was one of the last things we needed to check off, I was very reluctant to fork over that much money for a back splash.
Sooo getting creative again, I asked Derek how he would feel about a beadboard back splash? At first he did not see my vision at all! After many days of whining and explaining that even if we purchased the bead board and hated it, it would still be cheap enough to just throw away and get the tiled back splash. So we took another trip to Home Depot and purchased 2 sheets of beadboard that came to only $70!


As you can see, there were a lot of compromises that we had to make to stay within budget. However, at the end of the day, I don't think anyone would ever look at our kitchen and think..."Wow they should have sprung for ----"

Looking back on all of it now, our word of advice to anyone doing a kitchen reno is to look at the big picture!
Yes, laminate floors may have to be replaced if there is a spill, however, how much would it cost to replace them with new laminate floors? Is this still cheaper than installing tile?
Yes, it is not often that you see beadboard as a back splash but for only $70 why not take a chance! If it doesn't turn out, then you really only spent $70 for a fun crafty activity! And how many times will your guests say "WOW! Your TILE backsplash is to die for?!" and will your backsplash even get noticed amongst everything else in your kitchen? Is that worth spending the extra $830 in the long run?